
At Eraneos we have used Azure Data Explorer with great success in various projects involving timeseries data. Among other things these include monitoring and/or predictive maintenance on electrical scooters, buildings, and metering systems. However, as common with database systems, it is not easy to safely test and deploy code and schema changes without the risk of deleting data by dropping tables or columns. Over the years we have developed a way that works ‘pretty well’ and includes:
- Unit tests
- Integration tests
- Automated testing using Azure DevOps
- Deployment using Azure DevOps
- Publishing DevOps test reports
This article describes the setup we use to accomplish this including the tools used, project setup and DevOps pipelines. This is the third article in our series about Azure Data Explorer. You can find an introduction into Azure Data Explorer here, if you want to know more about this Azure service and its typical use cases, or you can read about Graph Analysis in Azure Data Explorer here.
Tools
The tools we use drive the entire setup and thus it makes sense to start with those. Whenever you search for Azure Data Explorer (ADX) in combination with CICD you probably end up with the following results: Delta Kusto, DevOps task for ADX and Sync Kusto. From these we use Delta Kusto (DK) and the DevOps tasks. It would be great if there was one tool to rely on but unfortunately this is not yet the case.
Delta Kusto is the most important tool we use. It compares two KQL codebases (two databases, database with directory of KQL scripts, etc.) and creates the ‘delta’ KQL code to transform the source into the target. We predominantly use it to create the delta between our codebase in Git and the actual database we want to deploy to. Delta Kusto has a feature to fail if the delta contains any drop commands which will delete data like ‘drop table’ or ‘drop column’. This is a must-have feature to protect against unintended data loss during the deployment process. For a more detailed description please check out the Delta Kusto page.
Delta Kusto supports most KQL statements like creation of functions, tables and update policies but does not support everything. Certain policies and Materialized Views are not supported yet, nor can Delta Kusto execute queries which are needed for testing. So, for KQL statements not supported by Delta Kusto we use DevOps tasks for ADX. This means that deployment is performed in two steps using two different technologies which can lead to a partial deployment. Fortunately, we have never seen this happen and only in the test or acceptance environment so we could fix issues before promoting the deployment further.
Development setup
For development purposes we typically use a cheap DevTest type of ADX cluster containing a development database for each developer. This provides each developer with their own workspace where code can be executed without interfering with each other. Alternatively, the Kusto Emulator can be used as a local workspace. Besides the development databases the cluster also contains a ‘target_devops’ database and ‘target’ database. The ‘target_devops’ database is solely used by Azure DevOps for the purpose of deploying code and running tests. The ‘target’ database is the actual database we are working on. Within this post I refer to this database as ‘target’ but in reality it will have a more descriptive name.
The overall flow using three environments is shown below. Each environment has a devops database used to test the deployment itself (making sure changes to tables do not destroy anything) and used for testing.
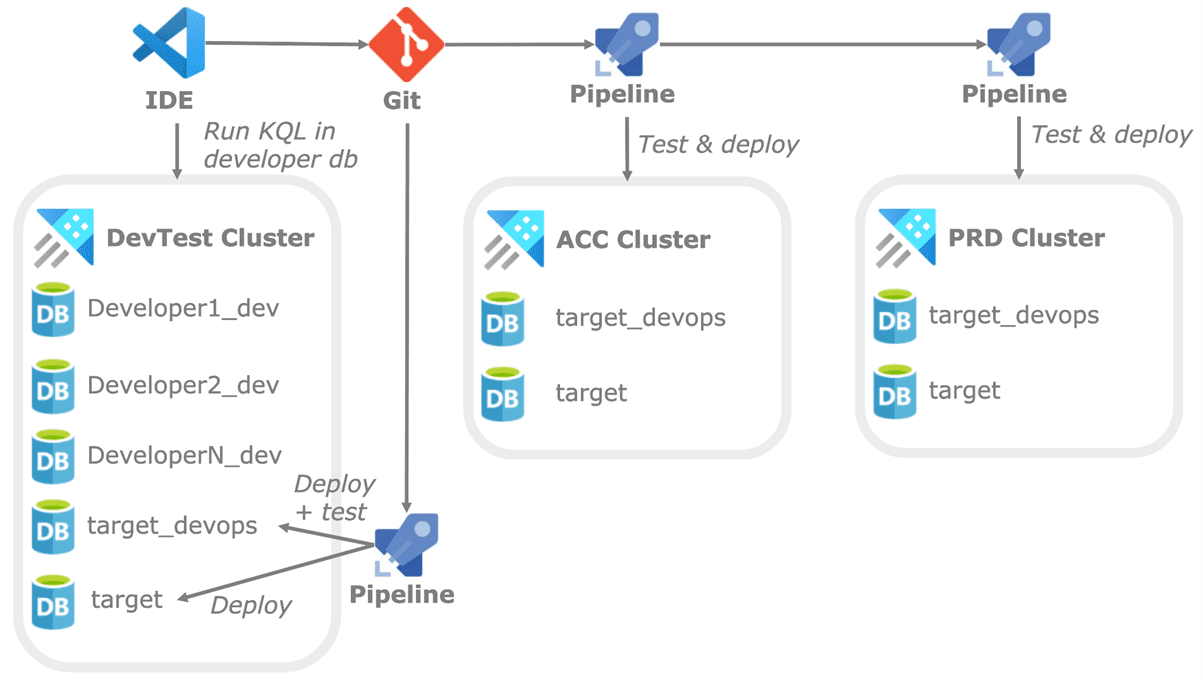
To keep it a bit simple I assume a single environment and single target database (with Git repo) but a real scenario will have multiple target databases within multiple environments. Although, such a setup makes it more complicated the concepts outlined in this post can be used for such scenario’s as well.
IDE’s and directory structure
For the actual development most people I know either use Azure Data Studio with Kusto plugin or Visual Studio Code with Kusto plugin. Both IDE’s work very similarly with respect to ADX and allow code to be implemented, versioned using Git, and executed against a cluster. More important than the actual IDE used is the directory setup which looks like:
- /cicd: holds Delta Kusto config files for various environments and purposes
- /scripts
- /dk: holds all code supported by Delta Kusto like functions and table statements
- /non-dk: contains all code not supported by Delta Kusto like materialized views
- /test: contains al test related code
- /prepare: holds all code needed to prepare tests which typically are test functions and statements that load data for integration tests
- /run: contains all code to actually run tests and assert results
- /teardown: any code needed to clean-up after test execution like the deletion of test functions and test data.
This is just the top-level directory structure, and it is possible to add other directories to organize code based on meaningful attributes. The top-level directory structure is important as DevOps will use the directories to properly deploy and test the codebase.
Testing
Let’s move on to the fun part of testing KQL and start with a little disclaimer – everything described in this section is functional rather than beautiful. Unlike popular programming languages KQL does not have a full-blown testing framework but does support two very important statements when it comes to testing:
- datatable: allows to create an in memory ‘dataframe’ which can be used as mock data for testing.
- assert: check for a condition and throws an error if it evaluates to false which can be used to error out when tests are not passed.
For testing purposes, it is very important that functions do not use tables/views within their body but instead all those objects must be passed as parameters. For most functions this is only a single table but functions which join multiple tables all must be provided to the function via parameters. This may make the creation of the functions a bit harder and more verbose but does make them easy to test. An example of such a function definition is provided below.
.create-or-alter function example(
     tableA:(str:string, num:int, …), // first input table with schema
     tableB:(id:int, value:float, …), // second input table with schema
     param3:string, … // other (scalar) parameters
){
     // body of the function using
     tableA, tableB and the other paramters tableA | where str == param3
     | join tableB on …
}
Test preparation
Each function in the code base should preferably have at least one test function for it which are defined in the /test/prepare directory. All test functions have the same structure:
- Start by defining some variables holding mock data using datatable()
- Execute the function to be tested using the mock data and maybe other parameters.
- Store test results in a datatable with format [testname:string, passed:bool, message:string] which is returned by the test function. This table is:
- Used in a later step to assert all tests were passed. If this is not the case the assert statement will trigger an error to be thrown which in turn halts the DevOps pipeline
- Transformed into JUnit XML format which is publish to DevOps test reports so we can view test results easily
A very simple example of such a test function is shown below and can be used as a skeleton for your own code.
.create-or-alter function testExample(){
  // Create test data for table A
  let _mockTableA = datatable(str:string, num:int, …)[
     "str1", int(201), …,
     "str2", int(36540), …,
  ];
  // Create test data for table B
  let _mockTableB = datatable(id:int, value:float, …)[
     int(1), float(42.12568) …,
     int(201), float(-315.5697),
  ];
  // run the example() function using the test data
  let _exampleResult = example(_mockTableA, _mockTableB, param3= ”str1” );
  // get actual test results from the resultset, usually by filtering and counting records
  let _resultCount = toscalar(exampleResult | count);
  let _countBigger0 = toscalar(exampleResult | where value > 0 | count);
  // return a datatable with the test results which can be assessed by the caller
  datatable (testName:string , passed:bool, message:string )[]
     | union (print testName='Example total row count', passed = _resultCount == 1, message=case(_resultCount != 1,          strcat('Result of example function should be 1 but is ', tostring(_resultCount)), ''))
     | union (print testName='Example results with value > 0 should be 0', passed = _countBigger0 == 0,message=case(_countBigger0 != 0, strcat('Result should be 0 but is ', tostring(_countBigger0)), ''))
A screenshot of a test function and the output is shown below. The function tested has the purpose of extracting relevant information from storage paths and this test validates if this function works as intended on some mock data.

Test execution
The above is just the definition of the test function, the actual execution is part of the code within /test/run directory and is shown below. The test itself is executed twice:
- First, the result is captured into JUnit format XML which DevOps can interpret and store as a Test Report. The output of this function is also shown in the screenshot. How this XML is put into DevOps Test reports is described in the DevOps section.
- The second result is evaluated using the assert() statement which throws an error if not all tests are passed. This will cause the DevOps pipeline to halt and avoid deploying any erroneous code. Within DevOps all tests are called in parallel which runs very fast and creates test output for all tests even if one fails.
Example test execution code is provided below.
// run test parse convert to JUnit XML format with the provided name to be used in DevOps Test Plans
testExample() | invoke toJUnitXML('Some example tests')

// run test and check the results
let passedAll = toscalar(
   testExample()
   | summarize passed = sum(toint(passed)), total = count()
   | project passedAll = passed==total
);
// perform an ASSERT which will throw an error if not all tests were passed so DevOps can halt
print passedAll = assert( passedAll, "Not all Example tests were passed");
As mentioned, it is not very pretty but functional in the sense that it allows test results to be inspected in DevOps and correctly handles test failures in deployment pipelines as well. The utility function transforming a datatable into JUnit XML is provided below.
// Utility function transforming test results into JUnit xml format which can be used within DevOps pipelines
.create-or-alter function with (docstring='Utility function to transform test results into JUnit XML', folder='test')
toJUnitXML(_testResult:(testName:string, passed:bool, message:string), _testsuiteName:string){
    _testResult
    | extend testCase =
        case(passed, strcat('<testcase name="', testName,'" />'), // simply add the testcase if it was passed
        strcat('<testcase name="', testName,'" ><failure message="',message,'" type="AssertionError" /></testcase>')) // add testcase with failure if test was not passed
    | summarize list = make_list(testCase) // group all test cases into a single array
    | project result = strcat(' <testsuite name="', _testsuiteName,'" >', // create the final JUnit XML result by concatenating all test cases and wrapping them in a single  <testsuite> element
        array_strcat(list, ' '),
        '</testsuite>')
}
Integration tests
Besides unit tests, which validate individual functions in a stand-alone setting, it is also possible to perform integration tests. This is very handy to test chains of ADX tables with update policies and materialized views. The setup is very similar to unit tests but instead of validating functions using mock data in datatable objects we append data to real tables in the target_devops database. Test functions validate the data within the tables and (materialized) views which are automatically loaded using the source table data. Since integration tests really store data it is important to run these in a separate database and delete the test data in the teardown step to avoid issues in subsequent test runs. An example in which some tables are cleared and test data is added is shown below. The actual test validates if the data is correctly transformed (type casting, datetime creation, deduplication, etc.) in the target fact table and materialized view. All testing is only performed in the ‘target_devops’ database to avoid test data leaking into the target database. The following example script is part of the test/prepare directory and clears + appends test data to tables. Actual assessment of data in various downstream tables is part of the tests/run directory.
// run a database script to clear test data and append new data for integration testing
.execute database script <|
    // remove test records if they exist
    .clear table realTableA data
    .clear table realTableB data
    // append data to tables so result from update-policies and materialized-views can be tested after
    .append realTableA <| datatable(str:string, num:int, …)[
"str1", int(201), …,
"str2", int(36540), …,
]
Test teardown
The last step is to clean up data and functions used for testing. This is done by executing scripts located in the tests/teardown directory which delete testing data and (optionally) drop test functions.
Azure DevOps setup
Everything described so far comes together in the DevOps pipelines used to test and deploy the codebase. The pipeline shown in this section is a classical ‘deployment’ variant but can also be a new one driven by the YAML definition. The pipeline used to test and deploy the code is shown below and used two ADX databases to do its job: ‘devops’ (for testing) and ‘target’ (to really deploy to).
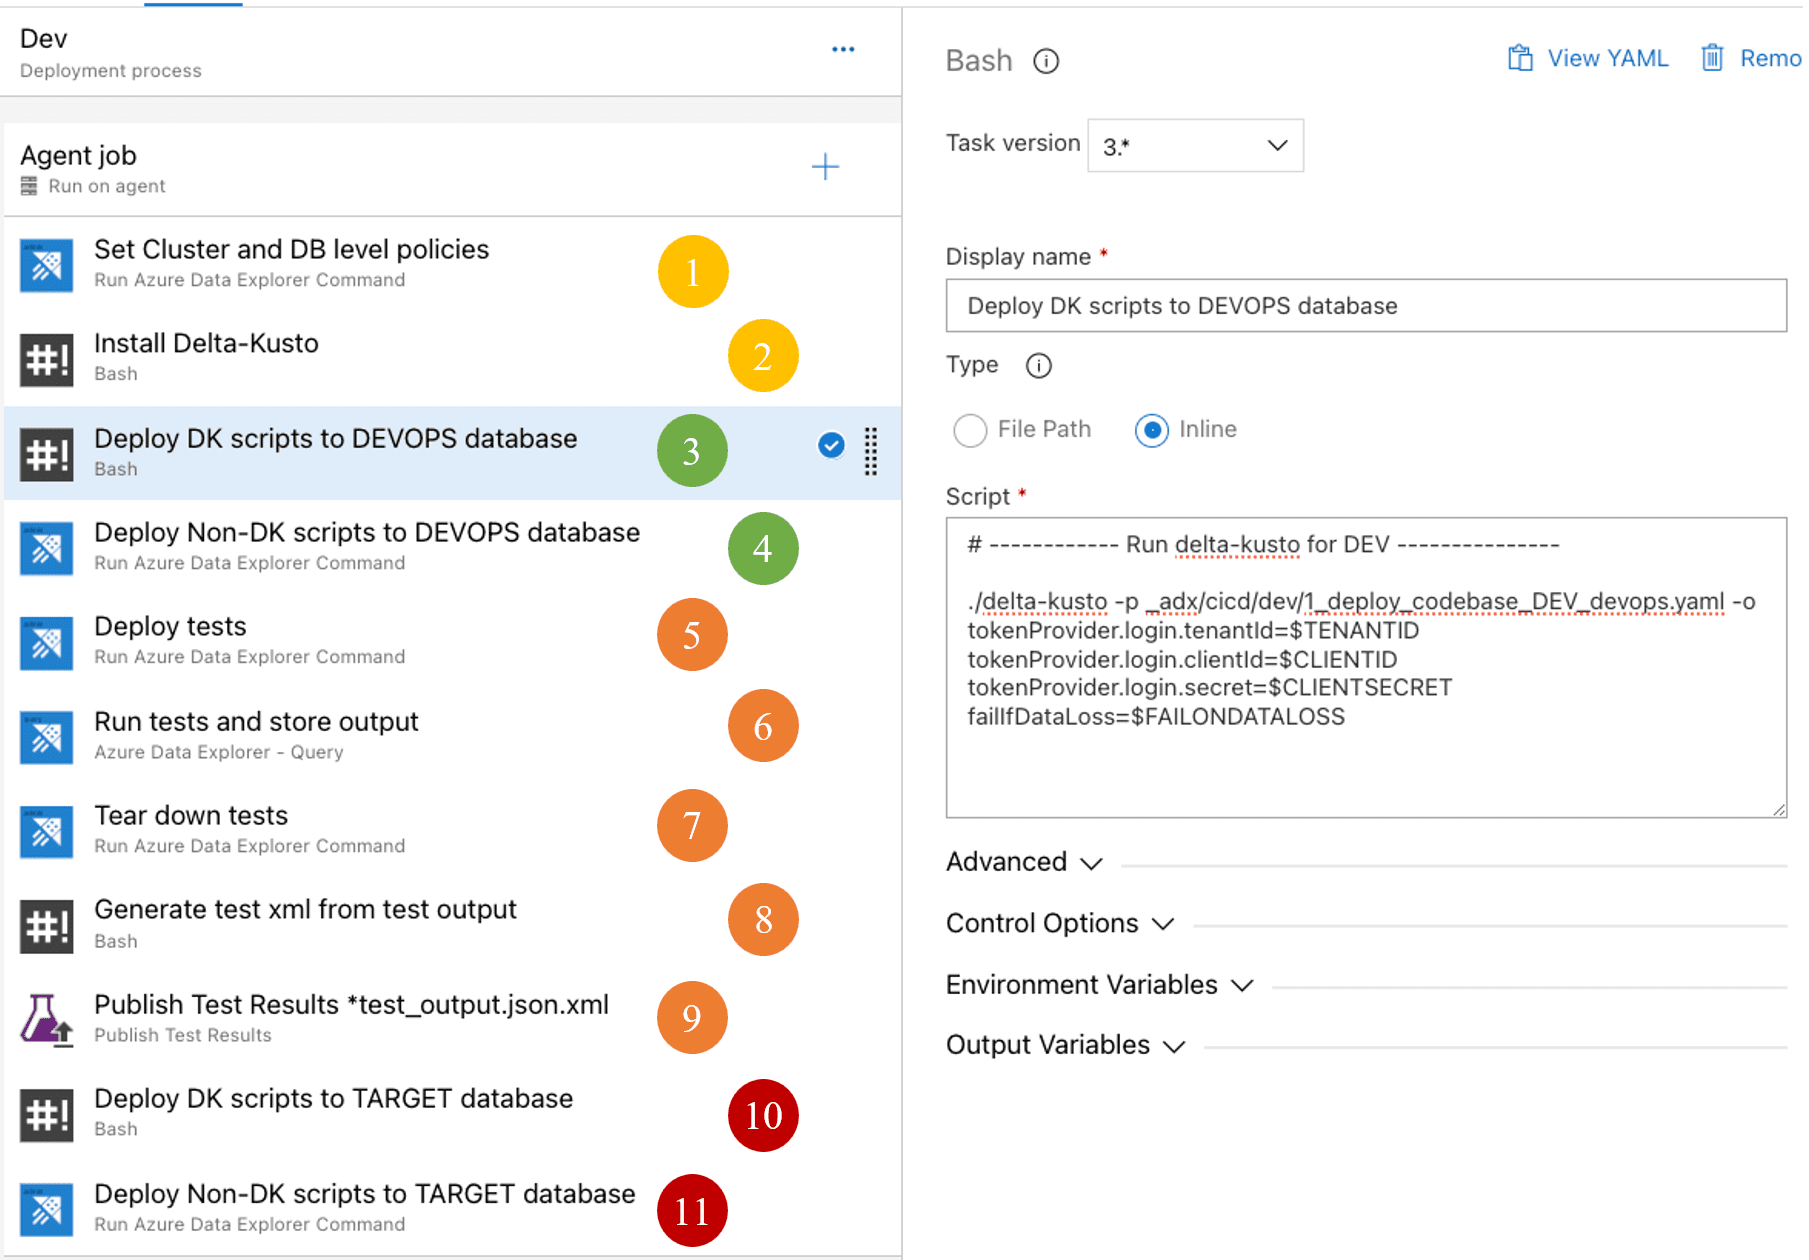
Yellow steps are generic setup steps to prepare the pipeline and the ADX cluster
- Use ADX Command activity to deploy some policies like the allowed number of concurrent queries. This step is only present at the dev and test environments to increase testing speed (allowing large parallelism on light weight test queries)
- Download and extract the Delta Kusto package within the DevOps agent so it can be used. This is documented on the Delta Kusto page.
Green steps deploy the code to the devops database:
- Deploy all KQL code that is supported by Delta Kusto, located in the /scripts/dk directory, to the ‘devops’ database. The command to do this is shown in the screenshot as well. Effectively it executes delta-kusto with a configuration file in the git repo. Sensitive information, like authentication information, is not put in the configuration file but instead passed to the command from pipeline variables. The FAILONDATALOSS flag is configurable upon execution and can be used to force deployment even if it results in data loss (for testing can be OK but should be used with extreme caution on acceptance or production).
- Deploy KQL code which is not supported by Delta Kusto, located in the /scripts/non-dk directory, to the ‘devops’ database using the DevOps ADX Command action. This action simply executes all KQL statements it finds within the directory. Hence it is best to use create-or-alter / create-merge statements to allow the commands to update existing objects.
Orange steps are all for testing, from preparation to publishing the test results:
- Deploy the tests within the ‘devops’ database by running all KQL commands found in the /tests/prepare. These typically are the declaration of test functions and ingestion of test data into actual tables used for integration tests.
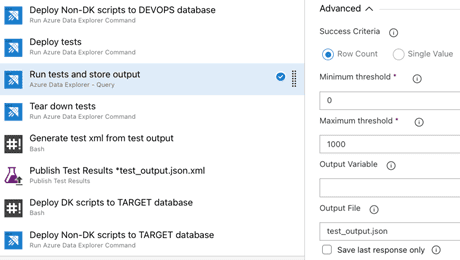
- Run the tests by running all KQL queries found in the /test/run directory. This step is configured to run queries in parallel and store the query JSON results in files within the agent. All tests are executed in parallel, and their results stored even if some of them fail. The advanced section of this task is shown below.
- Tear down tests by running all KQL statements found in the /test/teardown directory. This includes the deletion of test functions and removal of test data from tables.
- A bash script is used to extract the JUnit XML from the JSON test results. These XML snippets are part of the query result and encoded as an escaped string value within the JSON. The bash script uses grep and sed to extract, clean and store the xml as separate XML files. The bash script is provided below but a PowerShell alternative can also do the trick when running on a Windows agent.
echo "Extract XML content from the JSON test output"
find . -type f -name '*test_output.json' -exec sh -c "grep -o '<testsuite .*</testsuite>' {} > {}.xml" \;

echo "Unescape the XML content "
find . -type f -iname "*test_output.json.xml" -exec sed -i 's/\\\"/"/g' {} \;

echo "Delete empty test XML files to avoid these being published in DevOps in step 9"
find . -type f -name '*test_output.json.xml' -empty -print -delete
- All XML files are published as test results associated with the pipeline. This step simply scans a directory for XML files matching a pattern and publishes those to the pipelines test report. Doing this makes it a lot easier to track which tests failed and avoids eyeballing the test output for failing tests.
Red steps deploy the codebase to the target database but only if the only if all preceding steps were successful and none of the tests threw and assert exception:
- Deploy all KQL code that is supported by Delta Kusto, located in the /scripts/dk directory, to the ‘target’ database. This is the same as step 3 but now with the assurance that all tests were passed. This is run with fail-on-data-loss check enabled to make sure deployment doesn’t drop a table or columns.
- Deploy KQL which is not supported by Delta Kusto, located in the /scripts/non-dk directory, to the ‘target’ database. This is the same as step 4 but now with the assurance that all tests were passed and delta-kusto deployment was successful without any data loss.
As described before, the test results are put in an XML format and published to the pipeline’s test report. This looks like the screenshot below and allows us to easily view which tests have failed and track test results over time using the report function.
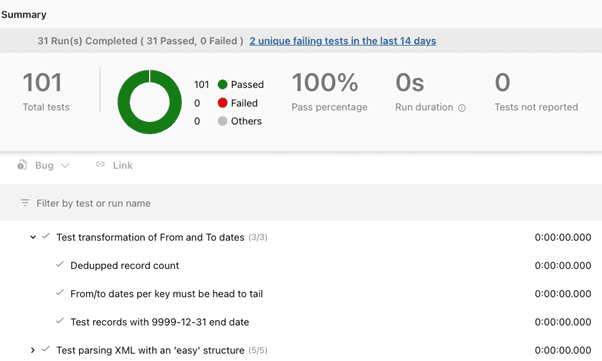
Deployment to acceptance and production clusters and databases follow the same steps which allows us to test in every environment. Before this is done the code from the current target database is synced to the target_devops database to make sure we deploy and test against the real live codebase.
Final remarks
We have been using this setup now in various projects within the scope of a single database. Overall, we are quite happy with it but there are also some points to consider:
- The non Delta Kusto code is not cleaned up on the target database. So if we remove or rename a materialized view the old one will simply remain. This leads to ‘orphaned objects’ which may still hold data and continue to grow and must be cleaned up manually.
- External tables are a bit tricky as the data exist outside of the database. When two databases, say ‘target_devops’ and ‘target’ both define an external table at the same storage location they will share that data. Because of this we encountered test data from integration tests in external tables. The data was stored there using continuous export from the ‘target_devops’ database and thus became part of the target database. Currently we delete data directly after tests so the chance of this happening is quite small, but it can still happen and is something to be aware of
- Changes that will delete data will not be executed automatically by Delta Kusto but they still need to be handled. Depending on the situation there are several solutions:
- Simply allow Delta Kusto to perform the drops if the data loss is acceptable and/or data will be reloaded afterwards. This can simply be done by setting the FAILONDATALOSS pipeline variable on true for a single run.
- Avoid deletion in the first place and only add columns instead of deleting them. Unused columns will be null which may consume a bit of storage space but otherwise are quite harmless.
- Perform some manual operations prior to deployment. For example, renaming a table and updating any reference to it using the ‘execute database script’ statement. Obviously, this is tedious work which must be scripted and validated on a non-production database. Whenever changes affect tables which are continuously loaded it can help to change the table ingestion into a new temporary table which does not have any update policies defined on it. That table will get all new data while maintenance is going on. When all changes are made the ingestion can be redirected to the original table again and data from the temporary table can be loaded downstream manually. Depending on data volumes and requirements, this can work well, although it introduces a temporary gap in the data consumers may observe.
I understand it can be quite complex and hard to understand simply by reading the guide. I hope it provides you with some inspiration and serves as a starting point for those struggling with ADX CICD. Feel free to reach out for more additional clarification.
Stay up to date!
Are you enjoying this content? Sign up for our (Dutch) Newsletter to get highlighted insights written by our experts.


")
