Azure Data Factory (ADF) is Microsoft’s cloud-based data integration and orchestration service. Whether you love it or not, ADF is a widely adopted tool, trusted by major organizations around the world to automate and manage complex data workflows. This blogpost focuses on CI/CD processes in Azure Data Factory (ADF) and assumes you’re already familiar with general ADF concepts and release frameworks.
Problem statement
Classic ADF CI/CD via UI-based deployment is somewhat rigid. You can deploy the entire state of an ADF instance into a another environment using the Azure Resource Manager (“ARM”) template and Azure DevOps Release pipelines following the GUI steps.
One of the issues that we faced during continuous development with ADF was the inability of setting trigger parameters. This limitation becomes especially relevant in the environments where same production source data is being loaded both into production and pre-production databases. To offload the production source systems, different trigger schedules were required for each environment. For example, in our client case production loads ran more frequently than pre-production ones. Thus, parametrizing trigger schedules was essential.
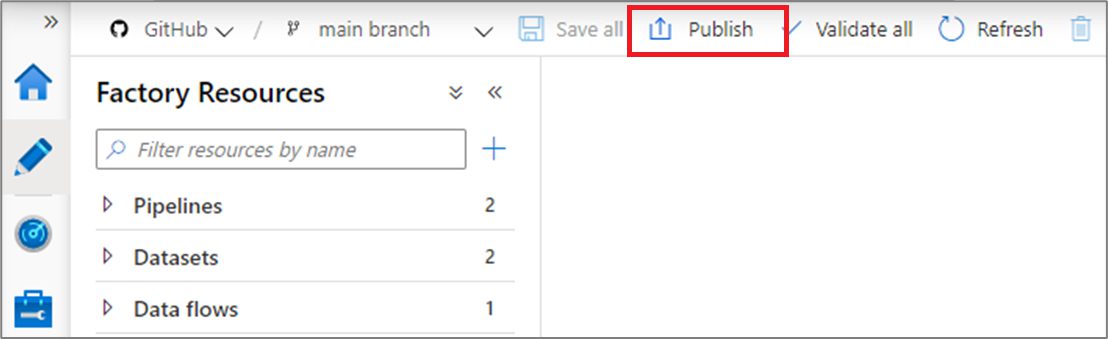
Another limitation in the ADF CI/CD is the manual steps required to publish changes. Before a release can be deployed, the ADF instance must be manually published through the ADF UI. When the Publish button is clicked, ADF validates all artifacts and updates the ARM template in the adf_publish branch.
Solution
2.1 Automated Validation & Publishing
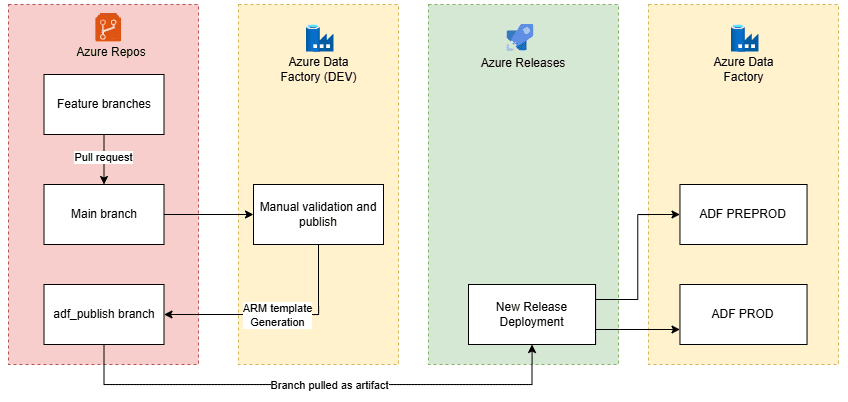
To automate the process of ADF release reducing the number of manual steps while making it flexible to override necessary parameters, we decided to migrate the ADF release from Azure DevOps Releases to Azure Pipelines. Both use YAML script to run their respective tasks. Hence, the main building blocks of the old pipeline could be copied and into the same blocks of the new pipeline. Here is how the migrated solution looks like.
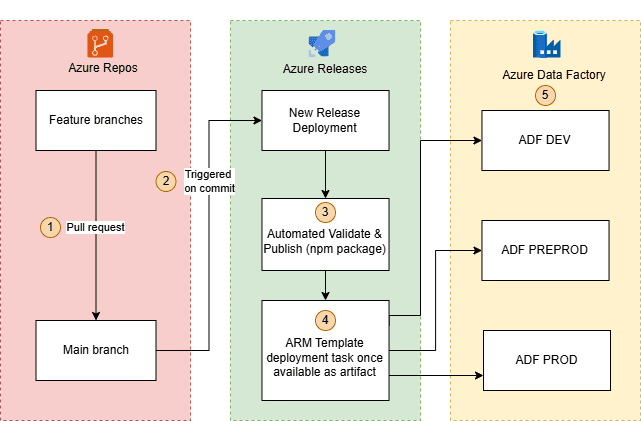
Step-by step explanation of steps:
- A pull request is created from feature branch into the main/master.
- Based on the new commit into main, the release pipeline is triggered in Azure DevOps.
- The pipeline performs automated validation and publishing of the ADF instance generating an ARM template.
- This ARM template is stored in the artifact folder which is created on the pipeline runtime.
- The ARM template is used to deploy to ADF Dev (automatic deployment, no changes applied), Preprod and Prod environments with the environment-specific override parameters.
Let’s dive into how the afore-mentioned issues are resolved with the new approach.
To deal with the manual validation and publishing, we had to make use of the publicly available npm package called @microsoft/azure-data-factory-utilities. This utility provides functionality to validate and export the ARM template programmatically instead of manually pressing the button after every commit to main. In the new approach ARM templates are generated and stored in the Artifacts folder which is generated on the pipeline runtime. There is no need to keep the adf_publish branch any longer. To make npm package available, we need to add a package.json file in the root folder of the Azure Repo.
{
    "scripts":{
        "build":"node node_modules/@microsoft/azure-data-factory-utilities/lib/index"
    },
    "dependencies":{
        "@microsoft/azure-data-factory-utilities":"^1.0.0"
    }
}
Npm package will perform the following actions using the below YAML script:
1) Install Node and the npm packages saved in your package.json file in the build.
- task: UseNode@1
  inputs:
    version: '18.x'
  displayName: 'Install Node.js'

- task: Npm@1
  inputs:
    command: 'install'
    workingDir: '$(Build.Repository.LocalPath)/<folder-of-the-package.json-file>' #replace with the package.json folder
    verbose: true
  displayName: 'Install npm package'
2) Validate all the Data Factory resources in the repository. This task is equivalent to pressing the Validate All button in ADF.
- task: Npm@1
  inputs:
    command: 'custom'
    workingDir: '$(Build.Repository.LocalPath)/<folder-of-the-package.json-file>' #replace with the package.json folder
    customCommand: 'run build validate $(Build.Repository.LocalPath)/<Root-folder-from-Git-configuration-settings-in-ADF> /subscriptions/xxxxxxxx-xxxx-xxxx-xxxx-xxxxxxxxxxxx/resourceGroups/<Your-ResourceGroup-Name>/providers/Microsoft.DataFactory/factories/<Your-Factory-Name>'
  displayName: 'Validate'
3) Validate and generate ARM template, which is equivalent to pressing “Publish” button in ADF.
- task: Npm@1
  inputs:
    command: 'custom'
    workingDir: '$(Build.Repository.LocalPath)/<folder-of-the-package.json-file>' #replace with the package.json folder
    customCommand: 'run build export $(Build.Repository.LocalPath)/<Root-folder-from-Git-configuration-settings-in-ADF> /subscriptions/xxxxxxxx-xxxx-xxxx-xxxx-xxxxxxxxxxxx/resourceGroups/<Your-ResourceGroup-Name>/providers/Microsoft.DataFactory/factories/<Your-Factory-Name> "ArmTemplate"'
displayName: 'Validate and Generate ARM template'
4) Publish the ARM template into the Artifact folder inside the same pipeline. This step publishes a folder with generated ARM template and Parameters file that can be used in later jobs.
- task: PublishPipelineArtifact@1
  inputs:
    targetPath: '$(Build.Repository.LocalPath)/<folder-of-the-package.json-file>/ArmTemplate' #replace with the package.json folder
    artifact: 'ArmTemplates'
    publishLocation: 'pipeline'
At this point, we have eliminated the need for manual publishing and ARM template generation, freeing both our ADF instance and developers from this repetitive task. Happy days!
2.2 Environment-specific trigger parameters setting
The next step in our deployment process involved handling parameterized trigger settings to run pre-production and production loads in different timeslots. AzureResourceManagerTemplateDeployment@3 task is reused to deploy the ARM template stored in the pipeline artifact earlier.
After migrating from the classic UI-based approach – where we could define overrideParameters directly in the deployment template – to Azure Pipelines, we needed to pass these parameters into the pipeline itself.
However, as the list of parameters can get quite long, managing them directly within the pipeline YAML becomes cluttered and inefficient. A cleaner approach was to store the parameters in a separate file within the Azure Repo and echo them in the pipeline using a variable like $override_parameters. This method improves maintainability and keeps the pipeline configuration more readable.
We advice to create a folder and files structure to store the indicated parameter files:
- cicd
     - preprod
        - override_parameters.yml
     - prod
        - override_parameters.yml
An example of a trigger parameter that was used to set the recurrence is given below. This parameter is stored in one of the files in the repo.
-TRIGGER_NAME_properties_typeProperties_recurrence {“frequency”: “Week”, “interval”: 1, “startTime”: “2025-05-03T08:00:00”, “timeZone”: “W. Europe Standard Time”, “schedule”: {“minutes”: [0], “hours”: [8], “weekDays”: [Saturday]}}
And, the task script in YAML that uses the override parameters from the file above:
- task: AzureResourceManagerTemplateDeployment@3
   displayName: “Deploy Preprod ADF from Main”
  inputs:
    azureResourceManagerConnection: 'copy-connection'
    subscriptionId: 'aaaa0a0a-bb1b-cc2c-dd3d-eeeeee4e4e4e'
    resourceGroupName: 'demogroup'
    location: 'West US'
    csmFile: “$(Build.Repository.LocalPath)/cicd/ARMTemplateForFactory.json”
    csmParametersFile: “$(Build.Repository.LocalPath)/cicd/ARMTemplateParametersForFactory.json”
    overrideParameters: “$(override_parameters)”
By migrating to a custom YAML pipeline instead of using the UI-based Azure Releases approach, and implementing the actions mentioned earlier, we resolved several issues that previously required manual intervention and carried a risk of error or improper deployment.